Kale Caesar Salad


As you know, I...love...kale.  So imagine my delight at opening my first Winter CSA box to find it blanketed in kale. Literally, the whole top of the box was kale-covered.  After a chard-heavy summer share, I quite literally squealed in delight, "ooooohhhhhhhhhhhheeeeee!"

Since then, I've enjoyed poached eggs over sauteed kale, kale chips, and the simple recipe below:  Kale "Caesar Salad."  What I love about this preparation is that you don't have to actually cook the kale.  And as a farm share loving neighbor** pointed out when I had him taste this the other night, this actually ups the nutritional value as you do not lose any nutrients to the cooking process. 

**Yes, during a rocking holiday party I pulled a fellow CSA lover from the living room into the kitchen to talk CSA, vegetable storage, and to taste this kale salad -- it was a nerdy vegetable convention in my kitchen and I loved it!

Kale Caesar Salad
Ingredients
  • 3 cups of washed, de-stemmed kale cut into bite-size ribbons
  • One lemon
  • 2-3 cloves of garlic, finely chopped
  • 5-8 tablespoons of freshly grated Parmesan cheese
  • 1/2 tablespoon of kosher salt
  • Pepper
  • Olive oil

Directions
  • Mash the garlic with the kosher salt, add to the bottom of your serving bowl
  • Juice the lemon on top of the garlic paste, removing any seeds
  • Add a couple of cracks of freshly ground pepper
  • Add 1/3 cup of olive oil and 5 tablespoons of Parmesan cheese, mixing until until the ingrediants form a dressing 
  • Toss in the kale to coat.  Sample your salad, and add more olive oil or Parmesan cheese to taste (i always end up with more of both!)
  • Let stand 15 minutes before serving
Dressing

Kale Caesar Salad

Bobby Flay's Wild Rice, Sausage & Goat Cheese Stuffing

For years, I skipped holiday stuffing opting for more mashed potatoes or starchy corn pudding. Perhaps it was my aversion to raisins (or any fruit in a savory dish) or dislike of those boxed, horribly hard croutons. Then I tried Bobby Flay's wild rice and goat cheese stuffing, and my oh my am I a convert!!  Stuffing is now hands down my favorite part of any holiday meal. We enjoyed it on Thanksgiving, and I will whip it up again this Sunday for the Christmas table. 

While Bobby's recipe is delicious on its own, I've made it enough times to alter it slightly for our tastes. Unsurprisingly to any regular LaurenLivingLocally reader, I added some kale. I also took the sausage down a notch in spiciness to accommodate the mixed palettes of our family. Lastly, I omitted parsley...the cardboard of herbs in my opinion. Otherwise, it is true to the original form and we enjoy every single flavor-packed bite.

The second best part of this stuffing recipe is the leftovers. Poach an egg, serve it for breakfast the next day and I promise you will be one happy camper.  The real question is why do we only serve scrumptious stuffing on the holidays? That has got to change! One of my 2012 food resolutions: Eat more stuffing! 

Bobby Flay's Wild Rice, Sausage & Goat Cheese Stuffing
Courtsey of Bobby Flay & the Food Network
Ingredients
  • 2 cups wild rice
  • 6 cups water / follow your rice directions
  • 1 pound diced sweet sausage (or spicy chorizo if your table can hack it!) 
  • 5 tablespoons unsalted butter
  • 1 large white onion, diced
  • 1/2 cup diced carrots 
  • 1/2 cup diced celery (optional)
  • 1 cup washed, de-stemmed and loosely chopped kale
  • 3 cloves garlic, finely chopped
  • 2 tablespoons fresh thyme, chopped
  • 1 loaf country-style bread, cubed (either day old, or toasted in the oven for crunchiness)
  • 2 to 4 cups chicken stock 
  • 12 ounces goat cheese
  • Freshly ground black pepper
  • Kosher salt
Directions
  • Preheat the oven to 375 
  • Combine the water, rice and 1 tablespoon of salt in a large sauce pan. Bring to a boil, reduce to low heat and cook for 1 hour and 15 minutes, (or follow directions on package).  Drain and set aside 
  • Melt the butter in either your final baking dish or a saute pan over medium heat, and cook the sausage, onions, carrots and celery until done.  Add the garlic, herbs & kale, and saute another 2 minutes, mixing frequently
  • Combine the bread, goat cheese, 2 cups of stock and rice with the vegetable sausage mixture and mix well to coat and melt the cheese.  It should be very moist, so add more stock if needed.  Add a few cranks of salt & pepper, and either bake in this dish or transfer to a large buttered baking dish
  • Bake, uncovered for 25-30 minutes.  Remove and let rest 10 minutes before serving
  • If you make this the day before, or want to enjoy it again in the morning, simply add a bit more stock and reheat for 20-25 minutes. 
Getting Started
 

A No-Justice to Deliciousness Final Product Photo 
 

Breakfast Stuffing with a Poached Egg!

Lauren Lately: Anything but the Kitchen Sink Soup

With winters tentacles firmly rooted, I've been craving and making lots of "cozy" soup dinners.  Warm, thrown together without precision, better served with a hunk of bread... that's Lauren Lately!

Anything but the Kitchen Sink Soup
Ingredients
  • 2+ types of veggies, chopped into bite size pieces (Yesterday I used 2 carrots, 2 celery stalks, and 1 cup of frozen CSA Swiss Chard. Small potatoes and turnips work well too)
  • 1/2 an onion, chopped
  • Protein of choice and/or a can of beans
  • Olive Oil
  • Stock
  • Herbs
  • Optional: Parmesan cheese
Directions 
  • Saute your onion, and any hardy vegetables in olive oil over medium heat for 4 minutes
  • If you are using it, add in the protein (2 crumbled sausages, 1 cup ground turkey, a handful of chicken pieces...) and stirring often continue cooking until warmed or cooked through
  • Cover the mixture with stock until everything is just submerged, then add another inch of stock on top
  • Add in any beans (kidney, garbanzo, black bean) or leafy vegetables (kale, swiss chard, radish leaves) and a couple sprinkles of herbs (dried or fresh rosemary, thyme, basil)
  • Cook over medium low heat for about 20 minutes, checking frequently until your sturdiest vegetable is cooked through
  • Optional: add in 1/2 cup of grated Parmesan cheese to thicken the broth
  • Enjoy with bread or crackers 

Butternut Squash Pasta Sauce


Inspired by this delectable sounding sauce, I decided to try my hand at using a butternut squash as a quick marinara sauce alternative.  Butternuts are highly contested in our household -- one of us finds them too sweet often raising a brow when it lands on the table, while the other of us loves it. As the cook, I have probably not disguised who is who whatsoever!  I still sneak into the rotation, roasting it with other vegetables like this, or masking it with other great flavors.  On this night, there was no masking....we had butternut squash pasta sauce for dinner.  Unsurprisingly, half of us enjoyed it.

I'd give it a 3.5 out of 5 on the flavor scale.  More importantly, I'd give it a 4.5 out of 5 for ease of preparation.  And lets be honest, mid-week, sometimes ease outweighs all else.

Next time, I would consider more onion or a roasted red pepper.  Do you have a favorite quick sauce recipe? I'd love to hear it in the comments section.

Butternut Squash Pasta Sauce
Ingredients
  • 1 large butternut squash, sliced in half lengthwise and seeds removed
  • 1/4 cup Parmesan
  • 1 onion, quartered
  • 1.5 teaspoons crushed red pepper 
  • 2 - 3 cloves garlic, skin intact
  • 2 tablespoons of olive oil
  • Salt & Pepper
  • Pasta of your choice + 2/3 of a cup of reserved pasta water
Directions
  • Preheat oven to 400F
  • Toss the onion, squash and garlic with olive oil in a roasting pan
  • Sprinkle with salt, pepper and the crushed red pepper and roast for 30-35 minutes, until browned 
  • Meanwhile, prepare the pasta reserving 2/3rds a cup of pasta water*
  • Remove the pan from the oven, separate the skin from the squash and garlic
  • Blend the squash, onion, garlic and parmesan until mixed in a food processor or blender.  In 1/3 cup increments, blend in the reserved pasta water until you reach your desired sauce consistency
  • Toss with the pasta, sprinkle with additional cheese and enjoy

*I often throw sturdy green vegetables into my cooking pasta with 1-2 minutes to go. Brocolli and green beans stand up well and add color and nutrients to the plate.

Uncle Steve's Homemade Granola


My Uncle Steve makes the best granola.  I quite literally look forward to trips to the Michigan cottage so that I can enjoy a heaping bowl of it each morning. He had just roasted a big batch when I arrived this past summer and I carried a half gallon bag home on the plane.

After getting my sticky paws on the recipe, I decided to share it with you here since it is a cinch to whip up (mix, toss, roast!) and provides weeks of morning enjoyment.  I am even toying with the idea of bagging it up for holiday gifts this year at the office. Who wouldn't prefer homemade granola over a cheapey bottle of red wine? Okay, maybe that's the pregnant me writing.

But.... there is a big but. If I am honest, it is really is a stretch to call this recipe local. While I purchased the goods from freshdirect.com and the labels "say" bagged in New York, I clearly know coconuts don't grow on trees here in Westchester. The one local component is the honey. Delicious local honey procured at the farmer's market. So forgive me, dear reader, for bending the rules with this recipe.  Roast this granola yourself and I trust all will be forgiven.

Uncle Steve's Homemade Granola
Ingredients
  • 5 cups old fashioned oats (not instant)
  • 1 cup wheat germ
  • 1 cup unsweetened coconut chips
  • 1 cup unsalted sunflower seeds
  • 1 cup pumpkin seeds/pepitas
  • 1/4 cup sesame seeds
  • 1/2 cup flax seeds
  • 1/2 cup chopped unsalted nuts of your choice (almonds, walnuts etc.)
  • 1/2 cup safflower oil
  • 3/4 - 1 cup of local honey 
Directions
  • Pre-heat the oven to 225 degrees
  • Mix all the dry ingredients together
  • Warm the oil and honey, and pour into the dry ingredients.  Mix well to coat
  • Bake for 2.5 - 3 hours, stirring well every half an hour 
  • Store in sealed containers and enjoy! 

The start
The dry ingredients
Local honey
The final product: delicious granola to enjoy with milk and fruit

Thanksgiving: The Day After

I am so obsessed with Thanksgiving stuffing that at this point my favorite part of the holiday may just be breakfast the day after: a poached egg over reheated stuffing! Here is what we enjoyed on Friday. I'll post the recipe soon. This one is so good there's no reason not to enjoy it all winter!

Spicy Sweet Potato Wedges


As U.S. Thanksgiving approaches, I thought I'd share a simple and savory sweet potato recipe. I've never taken to the marshmallow version that adorns many tables in late November. I am all for tradition, but marshmallow WITH a vegetable? It actually frightens me a little. I've gone the totally opposite route below tossing sweet potatos with chili oil for a banging result.

This year I have many things to be thankful for:  Our first home, the upcoming arrival of our first child, ours and our families health, this blog... my cup runneth over. Thank you for continuing to read about my cooking adventures.  My food blogosphere may be small, but I can't tell you just how much I am enjoying documenting my time in the kitchen.

Wishing you and yours a wonderful, and marshmallow free, Thanksgiving!!

Fiery Sweet Potato Wedges
Ingredients
  • 4 to 5 sweet potatoes, peeled and sliced into 1/3 inch wedges
  • Chili Pepper Oil (or Olive Oil with a teaspoon of Red Pepper Flakes)
  • Salt & Pepper
Directions
  • Pre-heat the oven to 375 degrees
  • Line a baking sheet with parchment paper
  • Toss the sweet potato wedges with chili oil to coat, 2 - 2.5 tablespoons for wedges from 4-5 small sweet potatoes
  • Arrange the wedges in a single flat layer on the paper, and sprinkle with kosher salt and a few good cracks of pepper
  • Bake for 15-25 minutes until darkened but not burned.  While this sounds like a wide range, the thickness of your baking sheet and wedges combined with varying oven powers will grateful influence cooking time.  Enjoy!
Before
 After
 

Why I love Fall...

Carrot & Butternut Squash Soup


Dipping a hunk of crusty bread into a bowl of homemade soup. Does it get any cozier than that? Fall is my absolute favorite season. Changing leaves, crisp air, sweaters, root vegetables, apples, simmering pots of goodness like the one above... that is pure happiness to me.

As my CSA share winds down (just one left, tear tear!), the root vegetables are in high supply.  We have a lot, and I mean a lot, of carrots.  If you have any carrot recipes to share, I'd love hear them in the comment section below.

The following soup recipe is a rustic, no muss no fuss preparation.  The optional addition of some cream or milk will richen it up.  I omitted in mine, and am enjoying this for lunch at work with a dollop of Greek Yogurt and a healthy handful of crackers.

Carrot & Butternut Squash Soup
Ingredients
  • 1 large or 2 medium butternut squash, peeled and chopped into chunks
  • 5 large carrots peeled and sliced
  • 1 large onion, diced
  • 1 tablespoon olive oil
  • 1 teaspoon dried sage
  • 1/2 teaspoon cayenne pepper
  • 5 cups of chicken or vegetable broth
  • 4 cloves garlic, minced
  • Optional: 1/2 cup of milk or cream

Directions
  • Heat the olive oil in a stock pot over medium heat until glistening.  Add the onion and garlic, and saute for 3 minutes until glistening. 
  • Add the carrots, and saute for 3 minutes. 
  • Toss in the butternut squash to coat, and top off with the stock, sage and cayenne.  Bring to a boil, and then reduce heat to simmer.  Simmer for 25 minutes under tender. 
  • Puree using an immersion blender, food processor or blender. 
  • If you'd like a creamier taste, stir in the milk or cream. 
  • Serve with chunky bread for dipping.  


      Butternut Squash and Swiss Chard Lasagna


      Our best couple friends here in New York just had a baby. Wasn't it kind of them to get going on all this just months before we do so we can inundate them with questions at every turn?  I think so!!!  A few weekends ago, I had grand plans to bring over dinner to visit with the baby and catch up with the new parents.... then an icky cold struck me down.

      Instead, I ended up baking a meal and dropping it off for the new parents to enjoy.  It included Coconut & Lime's butternut squash and swiss chard lasagna. They confirmed its goodness so I've shared the recipe here. I must admit to being *slightly* chard out with my CSA, so I loved using up a big bunch in such a tasty way.  I've added in a tomato-based top layer, unlike Coconut & Lime's version, simply because I like that kick of acidity.

      P.S. You will notice there are no pictures of the final product -- I had them bake it to serve warm.

      Butternut Squash & Swiss Chard Lasagna
      Courtesy of Coconut & Lime
      Ingredients
      • 1 large butternut squash, sliced in half lengthwise and seeds removed
      • 1/4 cup Parmesan
      • 1 lb no-cook lasagna noodles
      • 1 large bunch Swiss chard, rinsed and chopped into ribbons
      • 1 medium onion, diced
      • 15 oz ricotta cheese
      • 1 tablespoon olive oil
      • 1 teaspoon chopped or dried sage
      • 1 teaspoon paprika
      • 1/8 teaspoon nutmeg
      • 3 cups milk
      • 3 tablespoons grated Parmesan 
      • 3 tablespoons butter
      • 3 tablespoons flour
      • 2 cloves garlic, minced
      • salt & pepper
      • 1 cup of tomato sauce
      Directions
      • Preheat oven to 400F. 
      • Brush the butternut squash with a little olive oil. Place on a parchment lined baking sheet. Bake for 30-40 minutes or until fork tender. Allow to cool slightly. Scoop out the insides and mash.  Turn the oven down to 375F. 

      • Filling: Heat oil in a large skillet. Saute the onion until fragrant, then add the chard and sage. Saute until the chard is soft, about 3 minutes. Turn off the burner and allow to cool slightly before combining with the ricotta, nutmeg, salt, pepper and paprika.
      • Sauce: Melt the butter in a sauce pan.  Whisk in the flour, garlic and a few cranks of salt and pepper. Add the milk and whisk together until slightly thickened. Stir in Parmesan.
      • Assembly: Spread a thin layer of white sauce on the bottom of a 9x13 inch pan. Top with noodles then layer with a layer of squash then the chard-ricotta mixture and drizzle with sauce. Repeat, until out of noodles. 
      • Top with 1 cup of tomato sauce & sprinkled Parmesan cheese.  Bake covered for 30-35 minutes . Allow to sit about 5 minutes before slicing and serving.

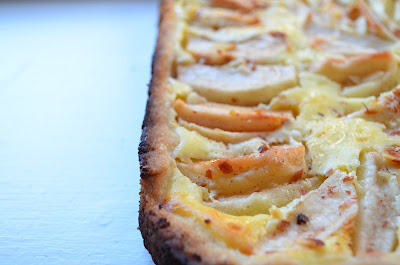
      Pear & Cream Cheese Tarts

      We closed the house in Montauk this past weekend, always a sad activity.  With the baby due date approaching, it seemed wise to close early.

      To mark our last weekend 'out east', a good friend invited us to a dinner party. She whipped up one of my favorite fall Martha recipe's, pot-au-feu, and a particularly juicy roasted chicken.  I created the little guys below for dessert. I wish I had thought to take a picture of the table.  Candles burning, fresh cut flowers, a table of friends... it was the perfect end to our Montauk season.

      The recipe looks complicated because of the length, but that is truly not the case. I combined a few favorite desert components for a quick baking treat. The crust bakes just once, unlike many tarts where the crust bakes first, and the pear and cream cheese filling are a cinch to pull together.  Enjoy!

      Perfect Pear Cream Cheese Tarts
      Ingredients
      For the Crust(s):
      • 1 cup all-purpose flour
      • 1/4 teaspoon salt 
      • 1/3 cup confectioners (powdered or icing)
      • 1/2 cup cold unsalted butter, cut into small pieces
      For the Filling:
      • One 8-ounce cream cheese, at room temperature
      • 1/4 cup sugar
      • 1 large egg
      • 1/2 teaspoon vanilla extract
      For the Pears:
      • 5-6 pears, cored, peeled
        • Note: If you are making the individual tarts, chop the pears into bite size pieces. If using one pan, slice into 1/4th wedges
      • 1/4 cup sugar
      • Juice of 1/2 lemon
      Directions
      • Preheat oven to 350F and place rack in center of oven.
      • Butter or spray either 6 mini tart tins like these, or a 9 inch spring form pan. 
      • Crust: In your food processor, pulse the flour, salt, and sugar together.
      • Add the butter and pulse until dough just begins to come together. If you don't have a food processor, you can mix by hand with two knifes.
      • Spoon the dough onto the bottom of the mini tarts or pan, and flatten out across the bottom and up the sides.
      • Cover with plastic wrap and place in the fridge.
      • For the Filling: Blend of food process the cream cheese until smooth. Add the sugar and mix well.
      • Blend in the egg and vanilla extract and process until smooth. Remove the crust from the fridge and scoop 1.5 tablespoons in each mini tart, or pour a thin layer of filling in a larger pan.  If you are making the mini-tarts, you will have leftover filling. 
      • Return to the fridge while you prepare the topping.
      • For the Topping: Combine the sugar and lemon juice in a bowl. Toss the pears in the sugar mixture. Arrange evenly over the cream cheese layer.
      • Bake at 350 for 18-20 minutes in small tarts or 25 to 35 minutes in the single pan, until the crust is brown and the filling is almost set. Remove from oven and place on wire rack to cool.
      • Sprinkle with confectioners sugar and serve at room temperature.


        Mexican at Home: Lauren's Sopes


        I enjoy dining out almost as much as I love cooking in: perusing menu's, finding neighborhood favorites, trying different cuisines...I love it all.  Having New York City at my finger tips, there is always a running list of restaurants I want to visit.  My husband jokes that you can tell how much I am enjoying a meal by how many times I utter "I am going to try and make this at home." 

        Recently, friends introduced us to this tasty Mexican restaurant on the Lower East Side. The meal was so simply perfect that I repeated the aforementioned "I'm going to make this" an obnoxious number of times.  And I've been doing just that, re-creating my favorite dish of homemade sopes, to perfect it before sharing it here.

        Like any good Mexican food, the two main success criteria are the sauce and the base. The sauce, you may remember from this post.  It's the wonderful Alice Waters Tomatillo Salsa Verde.  If you don't have tomatillos on hand, substitute fresh store-bought salsa or a really good gourmet jarred variety such as Green Mountain Gringo or Desert Pepper.

        The base and heart of this dish is a corn meal tortilla like cup, called a Sope.  These gems are so simple to make, I urge you to try it at home. It looks like a lot of steps but from start to finish it takes me about 20 minutes. I purchased the corn flour or masa harina on Amazon.com for close to nothing!

        Homemade Sopes
        Makes about 16 sopes serving 4-5 (recipe easily halves to serve two)

        Ingredients 
        Sopes:
        • 3 cups masa harina
        • 2 cups water or stock 
        • 2 tablespoons of vegetable oil
        Fillings:
        • 1 cup greek yogurt or sour cream whisked together with the juice of one lemon or lime, and a dash of hot sauce or srirachi
        • 2 cups shredded lettuce
        • 1 thinly sliced avocado
        • Alice Waters Tomatillo Salsa or store bought gourmet salsa variety 
        • Cooked protein or vegetables of your choice (sauteed shrimp, roasted chicken, browned beef or sausage or stir-fried peppers will all work)
        Directions
        • Prepare your fillings by chopping the lettuce, whisking the yogurt with the lemon, slicing the avocado and making or purchasing the salsa
        • Cook a protein to your liking. In the version below I sauteed:
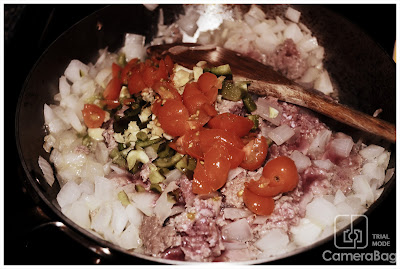
          • 1 chopped onion, 1/2 green pepper, 2 cloves of chopped garlic, 1 cup chopped cherry tomatoes, 1/2 pound of ground turkey, salt, pepper, a dash of cumin and a dash of hot sauce over medium heat until cooked through 
        Sope Directions modified from the Food Network
        • Mix the masa and water or stock together into a smooth consistency.
        • Create a ball of dough about the size of a cue or racketball ball, and roll it between your hands until firm. Cover the bowl with the remaining dough with a wet paper towel.
        • Place the masa ball in the middle of two plastic wrap lined cutting boards.  Apply pressure until ball pushes out to 4 to 5-inch diameter. (If the edges of patty crack deeply the dough is too dry, if the patty does not remove from the plastic easily the dough is too moist.) 
        • Heat a cast iron pan on high until hot. Place the masa patty (as many as will fit) on the pan without any oil, brown on both sides, approximately 1 minute on each side. Remove and let cool.
        • While still warm, form the edges up making a hollow tart like shell.  
        • Heat half the vegetable oil in the pan. Add thesope shells to oil and cook, flipping on both sides until slightly crispy and golden brown.  (The original recipe suggests you deep fry in 1 inch of oil. I opt for a lightly fried healthier version)
        • Hold warm for service.
        Assembly
        • Spread a teaspoon of the yogurt/sour cream sauce over each sope
        • Continue with a layer of protein, shredded lettuce, salsa and avocado
        • Serve and enjoy!
        • We are big eaters, and enjoy four per person, however three would likely suffice
        Ground Turkey Filling
        Mixing the Sope Dough
        The Sopes, pre filling
        ¡Buen apetito!
         

        P.S. I am playing around with different photography editing software, like this free trial from Camera Bag. Is there a software you prefer? I'd love to hear about it below.

        Quinoa & Kale Crustless Quiche

        This is my absolute favorite recipe to date on this blog.  Seriously, it is so so so good, I beg you to whip it up  yourself.  In this post, I told you about my obsession with kale and cheese, and in this one, you read about my love of the egg.  All these favorites combine for the perfect slice of deliciousness.  We enjoyed it for dinner first, and breakfast the next morning.  Rich kale, gooey sharp cheese, wholesome quinoa, carmelized onions, binding eggs.... If you are on the kale fence, as I hear many of you are, this is the dish to try it in.  I want to go make another right now!  Thank you @Food52!

        Quinoa & Kale Crustless Quiche
        Courtesy of Food52
        Makes About 6 slices

        Ingredients
        • 1/2 cup quinoaAsk the
          hotline about
          this ingredient!
        • 1 cup water or stock (veggie or chicken)
        • 2 tablespoons olive oil
        • 1 small bunch (2 cups) kale
        • 1 white onion, thinly sliced
        • 2 cloves of garlic, minced
        • ½ cup of sharp cheese, such as white cheddar or gouda 
        • 3 ounces of cream cheese
        • 4 eggs
        • Salt and pepper to taste 
        Directions
          • Preheat oven to 350 and butter or spray a 9" pie dish. Rinse the quinoa. Combine the quinoa and water or stock in a pot. Bring to a boil on medium-high heat and then reduce to a simmer for about twenty minutes. Set aside. 
          • Meanwhile, start to caramelize the onions. Heat the olive oil in a large saute on medium heat. When the oil is shimmering, add the onions. Slowly cook until  soft and browned.
          • Transfer the onions to large bowl. Add the kale into the hot onion pan. On medium heat, cook until the kale is wilted but still bright green, about two minutes.
          • Add the kale, quinoa, garlic, cream cheese and cheddar to the onions. Stir until mixed.
          • In a small bowl, whisk the eggs until well combined. Pour over the quinoa/kale mixture. Stir until the egg clings to the greens. Add salt and pepper.
          • Pour the mixture in the prepared pie dish. Bake for about 35- 45 minutes, until the top is golden and the pie has started to pull away from the edge of the baking dish.
             

            The Perfect (Fr) Omelet


            I remember the first time I had really good eggs. It was at my family summer cottage on Dorval Island near Montreal, and my Aunt Jane was at the stove.  This was before she and my uncle opened up their glorious bed and breakfast, and she had whipped up a batch of scrambled eggs for all the cousins. I undoubtedly ate and ran without stopping to share my delight in the eggs, but there was something in that scramble that made a life-long impression.

            My love of eggs has blossomed since that first great scramble. A poached or fried egg adorn many meals these days: pasta, roasted veggies, sauted leeks, burgers. Breakfast for dinner is a favorite in the Hayduk (HeyLocke?) household. So much so that I've been trying to perfect my omelet for years. My first major leap was realizing how much better an omelet cooks over medium-low heat versus high or even medium high.  The next breakthrough was upgraded pans thanks to generous wedding gifts.  And recently, well recently, I hit the omelet jack pot when my obsession with tearing out and filing recipes really paid off.

            I've made this "breakfast for dinner" omelet four times with my CSA eggs to make sure it really is "the" omelet recipe, ready for you dear readers. And it is. Oh, it is.

            P.S. If any of you make this one, I'd love to hear your reviews in the comments section!

            The Perfect Fromelet
            Modified courtesy of Food & Wine's Omelet Souffle  

            Ingredients 
            1 serving
            • Three eggs
            • 1 pad of butter 
            • Your choice of components: Onion, Mushrooms, Broccoli, Cheese, Bacon, Tomatoes, etc.
            • Salt & Pepper
            Directions
            • Start your oven broiler. 
            • Separate three large eggs. In a bowl, whisk the egg yolks with a pinch of salt.
            • In another bowl, whisk the egg whites until the top is frothy, about 1 minute by hand.  
              • Note: If you want to try to original "souffle" style of the recipe, whisk much longer until soft peaks form. I prefer Fromelet (frittata + omelet) style and whisk less.
            • Next whisk one-fourth of the egg whites into the yolks.
            • Fold in the remaining yolks until the two are combined and the colour is uniformed. 
            • In an 8-inch overproof nonstick or iron cast skillet, melt the butter over medium low heat.  Add the egg mixture, shaking to distribute evenly. 
            • Let cook for about 1 minute, then sprinkle the toppings evenly over the top.  
            • Transfer the entire pan to the oven and broil for 3-4 minutes before serving.  Holy yum!
            Whisked Bright Egg Yolks
             Frothed Egg Whites
             The Final Fromelet: Roasted Tomato and Goat Cheese
            Related Posts Plugin for WordPress, Blogger...
             
            BLOG DESIGN BY DESIGNER BLOGS